Migrate SAP and Other Workloads to AWS using DRS
Introduction
Organizations running mission-critical applications, like SAP, face the constant risk of application downtime and potential data loss caused by natural disasters, application failures, technical glitches, or human errors. These incidents not only disrupt business operations but also lead to significant revenue loss. To safeguard against such scenarios, it is essential to establish a comprehensive business continuity plan, with a key focus on disaster recovery.
This involves designing, implementing, and maintaining a robust disaster recovery plan that ensures the continuity of SAP workloads. In this context, AWS Disaster Recovery Service offers a reliable solution for setting up disaster recovery mechanisms, enabling organizations to effectively recover from disasters and minimize the impact on their revenue and operations.
How AWS Elastic Recovery Service (DRS) works
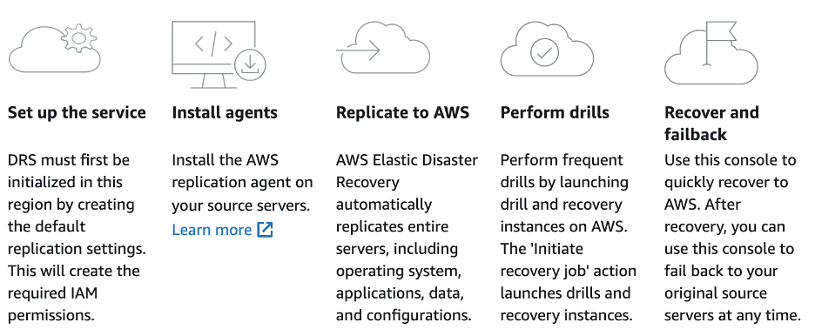
AWS Disaster Recovery Service (DRS) offers a reliable and scalable solution for establishing disaster recovery mechanisms for critical workloads, allowing organizations to protect their on-premise corporate network by replicating applications and data to AWS. The initial step involves setting up the DRS service by creating the default replication configurations for DR servers and installing the DRS agent on the on-premise servers. This agent facilitates the replication process by securely transferring the applications and data to a secondary environment in AWS. Once the agent is installed, AWS DRS continually monitors the health and status of the on-premise environment and continuously evaluates any changes or disruptions, ensuring a proactive approach to disaster recovery.
Installing AWS Disaster Recovery Agent in a secured network
Installing a service agent on a server is typically a straightforward process, but it can be challenging in tightly secured environments without internet access. In this blog post, we will guide you through the installation of the AWS Elastic Disaster Recovery (DRS) replication agent in such environments. To achieve this, we will utilize VPC interface endpoints and Amazon Simple Storage Service (S3) Gateway VPC endpoint capabilities.
Keep in mind that the Elastic Disaster Recovery agent requires access to the Amazon S3 service endpoint for downloading the agent installer and the replication agent itself. Additionally, the replication agent needs connectivity to the Elastic Disaster Recovery console during installation and while the source server is being protected. By following the steps outlined in this blog post, you will learn how to securely install the Elastic Disaster Recovery replication agent in tightly secured environments, ensuring data protection and continuity without compromising the stringent security measures in place.
Prerequisites
-
To proceed with this guide, the following prerequisites must be met:
-
Elastic Disaster Recovery service set up and configured in the DR Region.
Source servers (Windows or Linux) to install and configure Elastic Disaster Recovery agent securely.
Familiarity with concepts such as VPC (Virtual Private Cloud) and S3 (Simple Storage Service) endpoints, subnets, and security groups is essential.
A Site-to-Site VPN setup between the corporate data center and the AWS VPC (Virtual Private Cloud) is necessary.
Ability to create VPC endpoints, S3 endpoints, Gateway endpoints, and Security Groups.
Infrastructure Overview
We have an on-premise data center having multiple SAP workloads in a secured environment behind a firewall. The source servers have no direct access to internet. There is an AWS Site-to-Site VPN connection established between corporate network and AWS VPC.
Walkthrough
In order to successfully install the agent and ensure continuous operation on the source server, it is crucial to establish connectivity with the Elastic Disaster Recovery regional endpoint. Throughout the agent's lifespan, this connectivity remains essential.
To guarantee that the source servers can reach the Amazon S3 and Elastic Disaster Recovery regional endpoints, it is necessary to ensure that the on-premise network firewall permits outbound connections to VPC interface endpoints specifically over port 443. This requirement also applies to the Staging Area subnet within the AWS VPC, where the DRS replication server will be located.
Next, we need to create VPC endpoints for S3, EC2 and DRS services. For the S3 we need two different VPC endpoints, one Gateway Endpoint and one Interface Endpoint. The S3 Interface Endpoint for VPC is required for the on-premise servers to access S3 over VPN. Similarly, we will use S3 Gateway endpoint for the replication servers hosted on AWS VPC to access the S3 service privately. Furthermore, we also need DRS interface endpoint that will be accessible to on-premise servers as well as replication servers hosted on AWS VPC.

When we install the DRS agent on on-premise servers, it registers source servers with DRS console so we can monitor the progress of replication and also configure the launch settings for each registered source server from DRS console. Similarly, the DRS replication servers hosted in staging area subnet need to register with DRS service and it uses the DRS interface endpoint connect to the service over the private network.
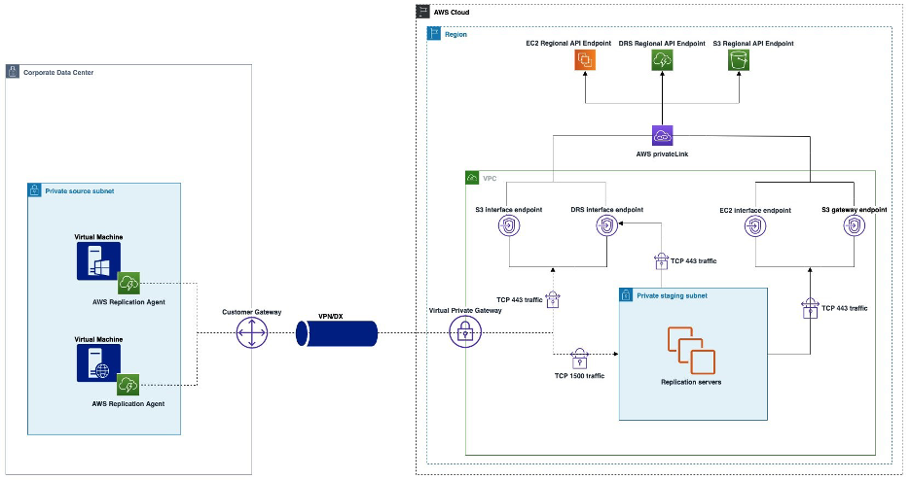
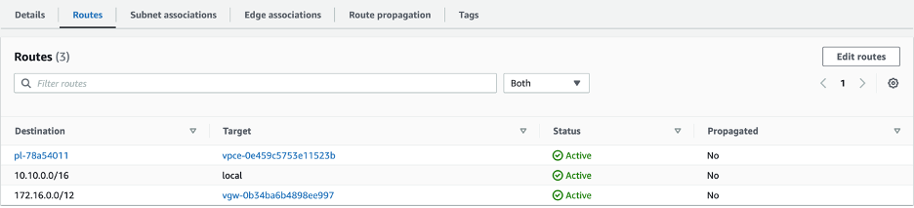
For the S3 Gateway Endpoint, we have to make sure that while creating the endpoint, it should be associated with the route table which belongs to staging area subnet where replication server will reside. Furthermore, same route table for staging area subnet will have another route for Virtual Private Gateway for the VPN connectivity.
Verify Connectivity
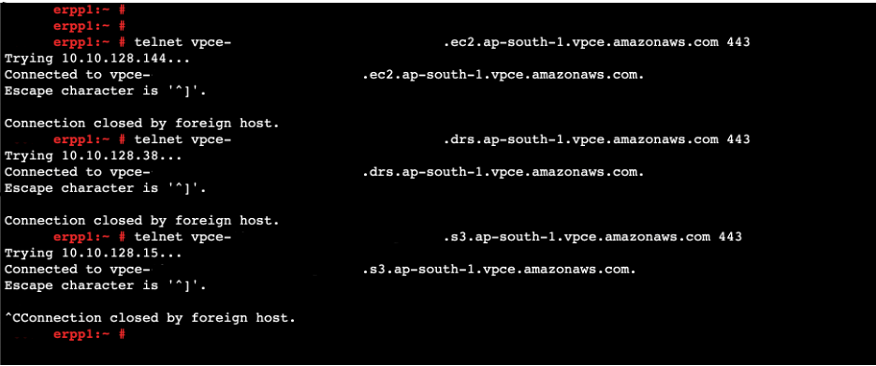
Once you have completed the prerequisite setup, you can proceed to establish connections to each interface endpoint on port 443. This step enables you to verify connectivity between your corporate network and the AWS VPC regional application programming interface (API) endpoints.
It is important to note that the DNS names generated from VPC endpoints are publicly resolvable, allowing you to resolve these endpoints from any location on the internet. These DNS names correspond to the private IP addresses of the endpoint network interfaces associated with the enabled Availability Zones (AZ).
We will run following commands from on-premise server to verify if it establishes connection with VPC endpoints over secured network (VPN).
|
#EC2 connectivity from on-premise. |
|
#DRS connectivity from on-premise. |
|
#S3-Interface connectivity from on-premise. |
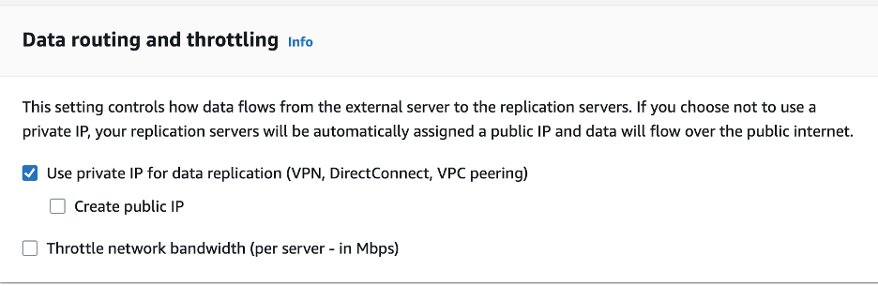
Now since we have verified the connectivity between on-premise servers and VPC endpoints, now it’s time to install the agent on on-premise servers and start the replication process. But before that, another important step is that while initializing the DRS setup from AWS DRS console, on Data and routing option chose “Use private IP for data replication”. This will ensure that there will be no public IP given to the replication server hosted on AWS VPC staging area subnet and thus the data replication from source to target will happen over the VPN connection.
After verifying the network connectivity and setting up the DRS console replication settings, we will now download and install DRS agents on source servers. If the source servers have no direct internet access, we can download agent on a S3 bucket and by installing the AWS CLI on source server we can copy the DRS agent S3 bucket to the source servers using S3 interface endpoint URL. Here is the example of command using S3 interface endpoint URL:
|
#EC2 connectivity from on-premise. |
However, our servers have outbound access to internet, we will directly download the agent from internet. We will use following command to download the agent.
|
#EC2 connectivity from on-premise. |
After downloading the agent, we will use following command to install agent on source servers. Command will include S3 interface endpoint URL as well as DRS interface endpoint URL. As mentioned in architecture above, DRS agent installed on source servers needs private access to S3 and DRS interface endpoints.
|
#EC2 connectivity from on-premise. |

Once the installation of the Elastic Disaster Recovery replication agent is complete, the role of the Amazon S3 interface endpoint is fulfilled. As mentioned earlier, the staging area relies on the S3 Gateway endpoint to retrieve the replication software from S3. Consequently, the replication servers will consistently utilize the Gateway endpoint.
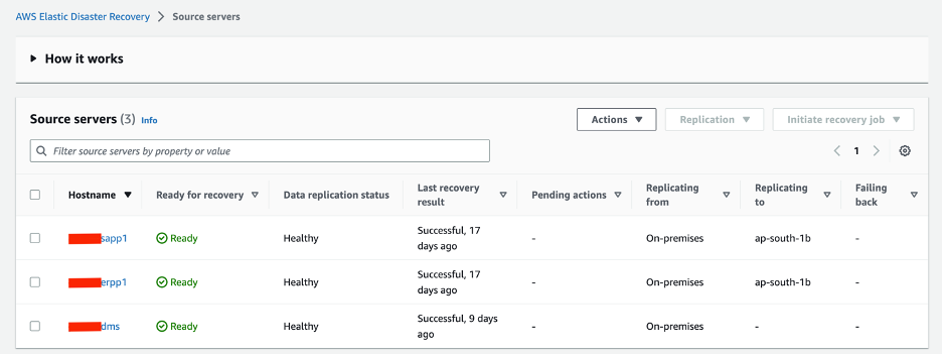
We can verify the source servers’ registration with DRS from AWS DRS console:
Possible Errors and Resolution
AWS DRS supports most of common Linux distributions as well as Windows operation system versions. However, there might be some cases when a particular Linux OS or Windows OS version will not be supported by DRS and therefore, even after the successful replication of source server the DRS will fail to launch the Recovery Server.
For example, if we setup the replication agent on SuSE Linux Enterprise Server 12 Service Pack 1, after the successful replication the server will fail to launch. While troubleshooting the issue, we noticed that this SLS 12 SP1 was deprecated in 2017 and therefore it is not supported by latest generation of AWS Nitro instances. When changed the instance type from Nitro to XEN generation, the server was still getting fail to launch.
Further digging into the issue, we noticed that source server is missing an important “XEN-KMP” package which contains the xen-blkfront and xen-netfront drivers that are required to initiate the recovery on XEN based instances.
To include required drivers, first we need to download and install required package on source server. Following commands will download and install required drivers on source server:
|
$
wget xen-kmp.rpm |
Run the following command to check whether xen-kmp (driver package for xen-pv) is installed:
|
$ rpm -qa |grep xen-kmp |
After installing the XEN-KMP package, we need to regeared the initrd that is created by AWS DRS agent and saved in /var/lib/aws-replication-agent/ directory in source server. Following command will be used to regenerate the initrd:
|
$ dracut -f -v --no-hostonly /var/lib/aws-replication-agent/aws-launch-initrd-`uname -r` |
Once the initrd is regenerated, we need to list the initrd to verify if the required drivers are included. To do this we will use following command.
|
$ lsinitrd /var/lib/aws-replication-agent/aws-launch-initrd-3.12.69-60.64.32-default | grep -i xen |
Once the required drivers are listed in initrd, wait for another 10 minutes for the next replication cycle that will include the regenerated initrd to the target root volume in AWS DRS staging area subnet. After waiting for 10 minutes, verify that new Point-In-Time snapshot is available in DRS console. Initiate the recovery with new Point-In-Time snapshot, this time the recover server will launch without and failure.
Conclusion
Deploying a service agent in an offline environment, such as highly secure environments, can present difficulties as most agents typically rely on an internet connection to establish service connectivity. However, we have demonstrated a method for installing the Elastic Disaster Recovery replication agent on servers within tightly secured environments that lack internet access. This approach ensures the security of your environment without compromising its integrity.